
 Español


When deploying Django apps on AWS, securely managing your access to S3 is critical. Hardcoding credentials is a major security risk. Fortunately, AWS provides two safe and effective ways to authenticate your backend when interacting with S3:
🔐 Two Secure Options to Access S3 from Django
| Option | Description | Best For | Security |
|---|---|---|---|
| 1. Environment Variables (env vars) | You define your AWS keys directly in Elastic Beanstalk as environment variables | Quick setup, staging/dev environments | Secure (if access to EB is restricted) |
| 2. IAM Role Attached to EC2 (Instance Profile) | EC2 instances automatically receive short-lived credentials using IAM Roles | Production environments, high compliance | Best Practice |
In this guide, we’ll walk you through both.
Option 1: Using Environment Variables
This method is ideal for local development and quick production deployments.
1. The Problem: Hardcoded Credentials
Avoid this in your settings.py:
AWS_ACCESS_KEY_ID = "AKIA123..."
AWS_SECRET_ACCESS_KEY = "abcd123..."
If this file is ever committed to version control, your AWS account could be compromised.
2. Load AWS Credentials from Environment Variables
Instead, use:
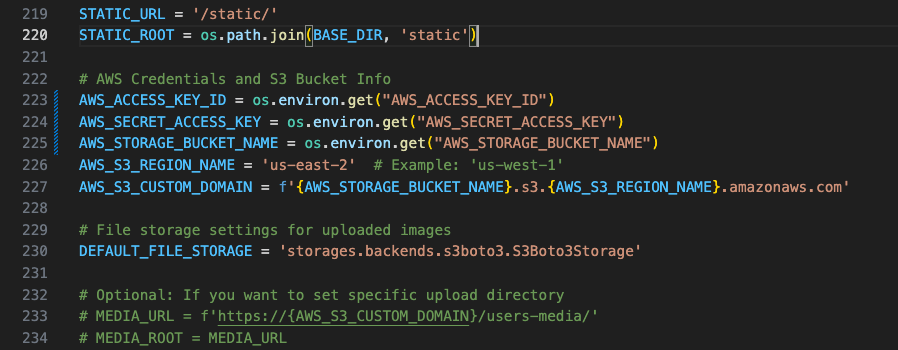
AWS_ACCESS_KEY_ID = os.environ.get("AWS_ACCESS_KEY_ID")
AWS_SECRET_ACCESS_KEY = os.environ.get("AWS_SECRET_ACCESS_KEY")
AWS_STORAGE_BUCKET_NAME = os.environ.get("AWS_STORAGE_BUCKET_NAME")
This keeps sensitive values outside your codebase.
3. Create a Loader Script: set_env.sh
At the root of your Django project:
#!/bin/bash
export AWS_ACCESS_KEY_ID="AKIA..."
export AWS_SECRET_ACCESS_KEY="abcd..."
export AWS_STORAGE_BUCKET_NAME="your-bucket-name"
Then:
chmod +x set_env.sh
4. Add It to .gitignore
# Environment secrets
set_env.sh
Never commit this script to Git.
5. Automate Loading with Virtual Environment
Edit your virtual environment’s activate script:
nano envs/bin/activate
Add at the bottom:
# Load AWS credentials automatically
source /absolute/path/to/your/project/set_env.sh
Example:
source /Users/yourname/Projects/su-backend/set_env.sh
6. Final Test
After activating your virtualenv:
source envs/bin/activate
echo $AWS_ACCESS_KEY_ID
You should see your access key printed.
Why This Matters
Environment variables keep your keys out of code and Git — reducing the risk of accidental exposure. This is a great solution for development or non-critical deployments.
Option 2: Use IAM Roles (Recommended for Production)
IAM Roles allow AWS to handle authentication automatically using temporary credentials, without you storing anything.
Step 1: Create an IAM Role
- Go to AWS Console > IAM > Roles
- Click Create role
- Select:
- AWS Service
- Use case: EC2
- Attach the policy:
AmazonS3FullAccess(or a custom policy for tighter security) - Name it:
DjangoStarsUp-InstanceRole-S3Only - Click Create role
Step 2: Attach the Role to Elastic Beanstalk
- Go to Elastic Beanstalk > su-env > Configuration
- Under Service access, click Edit
- In EC2 instance profile, select: CopyEdit
DjangoStarsUp-InstanceRole-S3Only - Click Apply
Elastic Beanstalk will restart the instance(s) with this new role.
Common Issue: Health Check Failure
When EB launches new instances, it checks the health by hitting /. If your Django app returns 404 or requires auth, EB will mark the instance as “unhealthy”.
Step 3: Add a Public Health Check Endpoint in Django
In urls.py, add:
from django.http import JsonResponse
from django.urls import path

urlpatterns += [
    path("health/", lambda request: JsonResponse({"status": "ok"})),
]
Deploy your app again.
Step 4: Update Health Check Path in Elastic Beanstalk
- Go to Configuration > Instance traffic and scaling
- Edit the default process
- Change the health check path from
/to/health/ - Click Save
Step 5: Update Your Django Settings for IAM Role
In settings.py:
import os

AWS_STORAGE_BUCKET_NAME = os.environ.get("AWS_STORAGE_BUCKET_NAME")

AWS_ACCESS_KEY_ID = os.environ.get("AWS_ACCESS_KEY_ID", None)
AWS_SECRET_ACCESS_KEY = os.environ.get("AWS_SECRET_ACCESS_KEY", None)

DEFAULT_FILE_STORAGE = 'storages.backends.s3boto3.S3Boto3Storage'
AWS_S3_REGION_NAME = 'us-east-1'
AWS_QUERYSTRING_AUTH = False

if not AWS_ACCESS_KEY_ID or not AWS_SECRET_ACCESS_KEY:
    print("Using IAM Role from EC2 instance profile")
If no keys are provided, boto3 will automatically use the IAM Role assigned to the instance.
Troubleshooting real: Actualizando el IAM Role sin romper el entorno
Cuando cambies el EC2 Instance Profile en Elastic Beanstalk a un nuevo IAM Role (como DjangoStarsUp-InstanceRole-S3Only), tu entorno entrará en modo de rolling update, y se lanzará una nueva instancia EC2 con ese perfil. Esto puede causar problemas si no lo preparas:
Problema común: Error 4xx y estado “Severe”
Si tu ALLOWED_HOSTS en settings.py no incluye la IP interna de la nueva EC2, Django rechazará las solicitudes del balanceador de carga, marcando la instancia como unhealthy.
Solución que funcionó (probada en producción):
Paso 1: Permitir todas las IPs temporalmente
Antes de cambiar el EC2 Instance Profile, comenta tu lista de ALLOWED_HOSTS y reemplázala con:
ALLOWED_HOSTS = ['*']
Paso 2: Haz un eb deploy
Esto te permite que la nueva instancia se cree, reciba tráfico y puedas ver su IP desde el panel de EC2 o desde logs.
Paso 3: Agrega la nueva IP interna a tus ALLOWED_HOSTS
Por ejemplo:
ALLOWED_HOSTS = [
    '127.0.0.1',
    'localhost',
    'abcd.us-east-2.elasticbeanstalk.com',
    'abcd.abcd.com',
    'abcd.cloudfront.net',
    'yourdomain.com',
    '172.31.XX.XX'  # IP privada de la nueva EC2
]
Puedes ver esta IP desde el EC2 Console o ejecutando:
curl http://169.254.169.254/latest/meta-data/local-ipv4
Paso 4: Haz un nuevo eb deploy
Ahora que la IP está permitida, puedes quitar ['*'] y quedarte con una configuración segura y funcional.
Verifica si está usando IAM Role o variables
Para confirmar que tu app está usando el IAM Role y no variables de entorno, accede por SSH a tu instancia EC2 y ejecuta:
env | grep AWS
Si no ves ninguna variable, entonces boto3 está usando correctamente las credenciales temporales que le otorga el IAM Role asignado a la instancia.
Permisos necesarios en el IAM Role (mínimo funcional)
Además de los permisos a S3, para que Elastic Beanstalk funcione correctamente, tu role necesita:
jsonCopyEdit[
  "cloudwatch:PutMetricData",
  "logs:CreateLogGroup",
  "logs:CreateLogStream",
  "logs:PutLogEvents",
  "ec2:DescribeInstances",
  "elasticloadbalancing:DescribeTargetHealth"
]
También puedes omitir permisos relacionados a contenedores como
ecr:*si no usas Docker.
Con esto, tu tutorial no solo es funcional, sino blindado para producción y muy útil para quienes enfrentan los típicos errores al configurar IAM correctamente por primera vez.
Final Result
Your Django backend now securely connects to S3:
- No credentials in code or on disk
- Automatically rotated credentials
- Scalable and AWS-compliant
- Working health check so EB can manage instances properly
Bonus: Custom Policy Example
If you want to limit access to a specific bucket only:
{
  "Version": "2012-10-17",
  "Statement": [
    {
      "Effect": "Allow",
      "Action": ["s3:GetObject", "s3:PutObject", "s3:ListBucket"],
      "Resource": [
        "arn:aws:s3:::your-bucket-name",
        "arn:aws:s3:::your-bucket-name/*"
      ]
    }
  ]
}

What’s Next?
I will also put a tutorial on how to use AWS Secrets Manager to securely store database credentials and other app secrets in production.